Deploying LingBot-World 1.3B natively on Windows: 13 frames of image-to-video on a 6 GB laptop
From nothing to a finished clip: environment checks, cloning the patched branch, aria2 multi-connection downloads, the CUDA gate, 13 weight checksums, and finally a 832×464, 13-frame image-to-video run. Commands are copy-paste ready and every step states how to tell it worked; the flash-attn problem that stops upstream on Windows is covered at the end.
Verdict
Runs when:Windows 11 x64, an NVIDIA driver, Git, FFmpeg/FFprobe, Python 3.12 x64 (the official installer, or the 3.12 that uv already provides). Keep the repo, dependencies, weights and output under one non-system drive (this article uses F:\AI); rollback is deleting that one directory.
Main limits
- This tutorial uses the branch that already carries the SDPA fallback patch (not an officially supported path); upstream as-is cannot install flash-attn on Windows — see the notes at the end
- VRAM was sampled once during the run, not continuously, so it is not a peak and must not be used to compare memory use across setups
- The model exit code was never read back; higher resolutions, more frames, multi-GPU, other GPUs and commercial use are all unverified
Experiment
| Hardware | NVIDIA GeForce RTX 3060 Laptop GPU · 6 GB · laptop · CC 8.6 |
|---|---|
| CPU / RAM | 12th Gen Intel Core i7-12700H · 64 GB |
| Model | LingBot-World 2.0 i2v-1.3B · F32 weights, cast to bfloat16 at load · image-to-video (DiT 1.3B + T5 + VAE) |
| Framework | Native Windows 11 · PyTorch 2.11.0+cu128 · local SDPA fallback patch · 1895d30 |
| Tested | 2026-10-05T12:10:57+08:00 |
Video
Preparation: environment, directories and prerequisites
This records the whole process of getting the smallest image-to-video path of LingBot-World 2.0 — i2v-1.3B — running on a Windows laptop with 6 GB of VRAM. Commands are copy-paste ready, and every step says how to tell it worked.
Which repository: the model and code come from robbyant/lingbot-world-v2 upstream (licence at the end). Upstream cannot install flash-attn on Windows, so a plain run stops at the install step. This tutorial uses the fork that already contains the Windows deployment changes:
https://github.com/nonpricklycactus/lingbot-world-v2Cloning the default branch is enough (the changes are all in it): upstream code (base commit 1895d300d8ac936401689b26389f51cbd36530eb) plus the SDPA fallback patch plus deploy/ with the manual, a step executor, the patch verification record and a Windows requirements list.
Prerequisites: Windows 11 x64; an NVIDIA driver; Git; FFmpeg and FFprobe; Python 3.12 x64 (official installer, or the 3.12 that uv already provides on this machine); at least 20 GB of free disk, not on the system drive.
Directory convention: repo, dependencies, weights and output all live under one root, so rollback means deleting that one directory:
F:\AI\lingbot-world-v2     repo and virtual environment
F:\AI\models              weights and shared assets
F:\AI\runtime             download caches (uv / pip / wheels)
F:\AI\lingbot-output      output video
Note: you can change the drive letter, but then every variable in the commands below has to change with it — changing drives means editing $Root in one place.
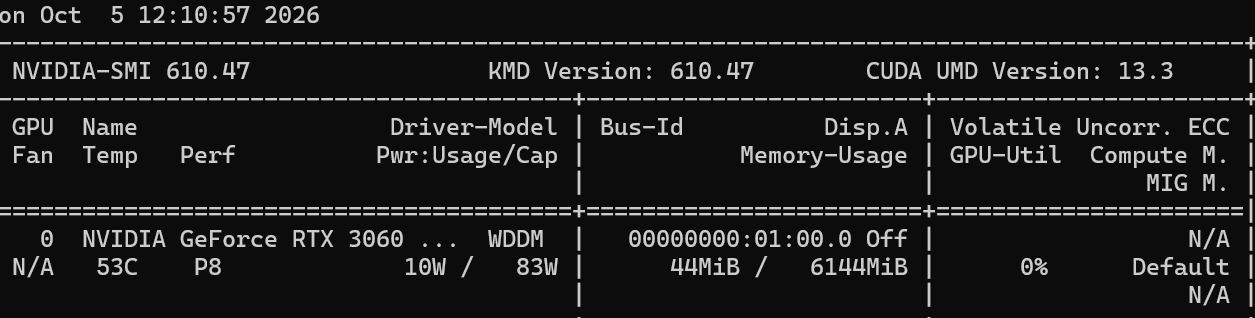
The machine used here: NVIDIA GeForce RTX 3060 Laptop GPU, 6144 MiB of VRAM; 63.73 GiB of system RAM; Windows build and driver are in “Experiment info”.
Step by step: from clone to finished clip
Step 1 · Record the machine and tool versions. Capture the scene first, so every later step has something to compare against:
nvidia-smi
Get-CimInstance Win32_OperatingSystem | Select-Object Caption,Version,OSArchitecture
Get-CimInstance Win32_ComputerSystem | Select-Object Manufacturer,Model,@{N='RAM_GiB';E={[math]::Round($_.TotalPhysicalMemory/1GB,2)}}
Get-Command nvidia-smi,git,ffmpeg,ffprobe | Select-Object Name,Source
Get-PSDrive -PSProvider FileSystem | Select-Object Name,Free
How to tell it worked: you can see the GPU name, total VRAM, driver version, OS build, RAM and the free space on the target drive.

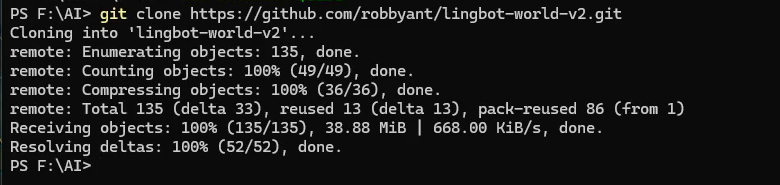
Step 2 · Get the code. Use the patched fork and confirm the patch is there while you are at it:
$Root = 'F:\AI\lingbot-world-v2'
git clone https://github.com/nonpricklycactus/lingbot-world-v2.git $Root
Set-Location $Root
git log --oneline -1
Select-String -Path wan\modules\attention.py -Pattern '_sdpa_varlen_attention' | Select-Object -First 1
How to tell it worked: the clone succeeds and the last command finds _sdpa_varlen_attention — the SDPA fallback is in the repo, and that is what makes this path work on Windows.
Step 3 · Create the virtual environment. Point the caches at the same drive too, so several GB of wheels do not pile up on the system drive. If you installed Python from the official installer, replace $Py with python and everything else is identical:
Set-Location $Root
$env:UV_CACHE_DIR = 'F:\AI\runtime\uv-cache'
$env:PIP_CACHE_DIR = 'F:\AI\runtime\pip-cache'
$Py312 = (uv python find 3.12).Trim()
& $Py312 --version
$Venv = Join-Path $Root '.venv'
uv venv --python 3.12 --seed $Venv
$Py = Join-Path $Venv 'Scripts\python.exe'
& $Py --version
& $Py -m pip --version
Careful: the Microsoft Store python is only a stub — installing dependencies and creating a venv both fail with it; and an interpreter that is too new may not match the Windows PyTorch wheels.
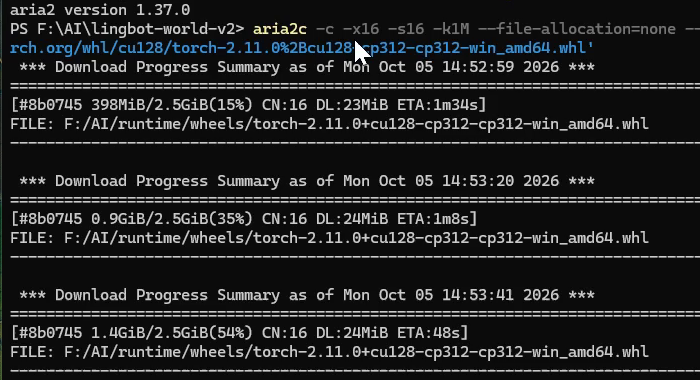
Step 4 · Install dependencies. The Windows torch wheel is close to 3 GB and a single connection is slow: fetch it locally with multi-connection aria2 first, let pip install that local file, then install the rest from the repo's Windows requirements list:
$Whl = 'F:\AI\runtime\wheels'
New-Item -ItemType Directory -Force $Whl | Out-Null
aria2c -c -x16 -s16 -k1M --file-allocation=none -d $Whl -o 'torch-2.11.0+cu128-cp312-cp312-win_amd64.whl' 'https://download.pytorch.org/whl/cu128/torch-2.11.0%2Bcu128-cp312-cp312-win_amd64.whl'
& $Py -m pip install --progress-bar off "$Whl\torch-2.11.0+cu128-cp312-cp312-win_amd64.whl"
& $Py -m pip install --progress-bar off torchvision
& $Py -m pip install --progress-bar off -r deploy\requirements-windows.txt
deploy\requirements-windows.txt is the list maintained on this branch: it includes einops (upstream's list omits it, while the model code uses it) and it leaves flash_attn out (it cannot be installed on Windows).
How to tell it worked: & $Py -m pip list shows torch 2.11.0+cu128, transformers, diffusers, einops and the rest.
Step 5 · Pass the CUDA gate:
& $Py -c "import torch; print('torch:', torch.__version__); print('cuda_available:', torch.cuda.is_available()); print('torch_cuda:', torch.version.cuda); print('gpu:', torch.cuda.get_device_name(0) if torch.cuda.is_available() else 'no CUDA')"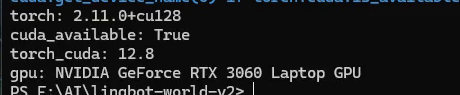
How to tell it worked: cuda_available is True, torch_cuda is 12.8 and the card name reads back. The CUDA UMD that ships with the driver may be a different version (13.3 on this machine); that is a different layer from the 12.8 PyTorch was built against, and having both is not a conflict.
Step 6 · Download the weights and verify them. The 1.3B pack is mainly the DiT weights; T5, VAE and the tokenizer are reused from the 14B assets — take only the files you need, do not pull the 14B body:
& $Py -m pip install 'huggingface_hub[cli]'
$Hf = Join-Path $Venv 'Scripts\hf.exe'
$Models = 'F:\AI\models'
& $Hf download robbyant/lingbot-world-v2-1.3b-causal-fast --revision 7e36a5f919f86cb4255cc9bfc30adb44963fbde1 --local-dir "$Models\downloads\lingbot-world-v2-1.3b-causal-fast"
& $Hf download robbyant/lingbot-world-v2-14b-causal-fast --revision 5c33dd40b213598c418fd25bff30fdbd23fd38a7 --local-dir "$Models\lingbot-world-v2-14b-assets" --include 'Wan2.1_VAE.pth' --include 'models_t5_umt5-xxl-enc-bf16.pth' --include 'google/umt5-xxl/*'
How to tell it worked: the six DiT shards plus the index, T5, VAE and the four tokenizer files are all there — and then check SHA-256 one by one (the expected values are in deploy/patch/ and in 01-实验/2026-10-05_lingbot-deploy-windows/model.json). In this run all 13 of them matched.
Step 7 · Run 13 frames:
Set-Location $Root
$Dit = Join-Path $Models 'downloads\lingbot-world-v2-1.3b-causal-fast'
$Assets = Join-Path $Models 'lingbot-world-v2-14b-assets'
$Image = Join-Path $Root 'examples\03\image.jpg'
$ActionPath = Join-Path $Root 'examples\03'
$Out = 'F:\AI\lingbot-output\lingbot-13f.mp4'
New-Item -ItemType Directory -Force (Split-Path $Out -Parent) | Out-Null
$RunArgs = @('generate.py','--task','i2v-1.3B','--infer_mode','causal_fast','--size','480*832','--frame_num','13','--ckpt_dir',$Dit,'--assets_dir',$Assets,'--image',$Image,'--action_path',$ActionPath,'--t5_cpu','--convert_model_dtype','--offload_model','True','--local_attn_size','18','--sink_size','6','--base_seed','42','--prompt','A serene lakeside scene with a lone tree standing in calm water, surrounded by distant snow-capped mountains under a bright blue sky with drifting white clouds.','--save_file',$Out)
& $Py @RunArgs
How to tell it worked: the terminal first prints loading lines, then INFO: Generating video with a progress bar, and finally INFO: Saving generated video and INFO: Finished.. Speed up long waits in the edit and say so; the real elapsed time comes from the log timestamps.
Step 8 · Accept the output. A file existing is not the same as a successful generation — at minimum keep the exit code, a non-zero size, the SHA-256 and ffprobe:
Get-Item -LiteralPath $Out | Format-List FullName,Length,LastWriteTime
Get-FileHash -LiteralPath $Out -Algorithm SHA256
ffprobe.exe -v error -select_streams v:0 -show_entries stream=width,height,nb_frames,avg_frame_rate,duration -of json $Out
Every parameter in that command
Each parameter appeared in the step 7 command; what they do:
--task i2v-1.3B: task and model size — image-to-video, 1.3B.
--infer_mode causal_fast: the few-step distilled causal path, which runs on a single card; causal_pretrain is the other, slower path.
--size 480\*832: input area and orientation; the output is rewritten to 832×464 to follow the aspect ratio of the starting image.
--frame_num 13: how many frames to generate; the shortest legal length on this path is 13 (4n+1) — anything smaller collapses the time dimension to 0.
--ckpt_dir / --assets_dir: the DiT weight directory, and the shared T5 / VAE / tokenizer directory.
--image / --action_path: the starting image, and the directory of camera-trajectory action files; causal_fast exits before sampling if --action_path is missing.
--t5_cpu: keep the T5 text encoder on the CPU to save VRAM.
--convert_model_dtype: convert weights to bfloat16 while loading.
--offload_model True: move the model back to the CPU after each forward pass.
--local_attn_size 18 / --sink_size 6: the KV-cache window length, and how many prefix frames are always kept.
--base_seed 42: the random seed, for reproducibility.
Measured results and acceptance
This run completed on a 6 GB laptop, and the output matches earlier records:
- Generation: 763 seconds between
Generating videoandSaving generated videoin the log (about 12 min 43 s), covering everything after the model was loaded. - Output: 832×464, 13 frames, 16 fps, 0.8125 s, 1,273,344 bytes, SHA-256
897c908d04950630a89ac88f95e3831c3327f76e4be796af0d2b507cf6d66b8f. - VRAM: one sample during the run read 4996 MiB / 6144 MiB (idle 44 MiB), with no OOM.
- Weights: DiT is 6838201925 bytes, T5 and VAE and the other shared assets total 18729186304 bytes, and all 13 SHA-256 checks matched.
- Download: for the same wheel, a single connection ran at about 2.15 MiB/s, while aria2 averaged about 18 MiB/s and peaked at 24 MiB/s.


FAQ, boundaries and licence
flash-attn will not install? (this branch already sidesteps it) Upstream's causal_fast cross-attention hard-depends on flash-attn, there is no usable wheel for Windows, and building from source needs MSVC plus a CUDA version matching PyTorch — run upstream as-is and you stop at the install step, with all three causes true at once. This branch's wan/modules/attention.py adds a PyTorch SDPA implementation with semantics equivalent to flash-attn varlen: GQA expansion, variable-length padding, causal masking, a sliding window. An environment with the real flash-attn installed still prefers it automatically — no rollback needed — and you can force either side with WAN_ATTENTION_IMPL=auto|flash|sdpa. To check what changed, see deploy/patch/attention-patch.diff (125 lines) and deploy/patch/VERIFY.txt (17 offline tests plus a CUDA smoke test).

Is that 4996 MiB a peak? No. It is one sample taken during the run, not a continuously sampled peak, so it cannot be compared against other setups — it only says this run did not OOM.
Why is there no exit code? The command that would have printed it was never written to disk, and this run did not read it back, so this article does not invent a number. The evidence of success is that the output file exists, ffprobe passes, and the spec matches the record.
Does this generalise? It only speaks for this machine and these versions. Higher resolutions, more frames, other GPUs, real-time generation and commercial use are all unverified.
Boundaries: the upstream code and model licence is attribution, non-commercial, share-alike (CC BY-NC-SA 4.0); this tutorial grants no commercial licence. The SDPA patch on this branch is a local experimental change, not a supported path — if you hit problems, read upstream's README alongside this.